Microsoft releases Remote Desktop 8.0 – for iOS and Mac

Snip20131021_1

Microsoft Remote Desktop app, you can connect to a remote PC and your work resources from almost anywhere. Experience the power of Windows with RemoteFX in a Remote Desktop client designed to help you get your work done wherever you are. Once these new Remote Desktop apps, which include an overhauled version of the two-year-old Mac Remote Desktop client, are available, Microsoft will be providing access to virtual desktops on everything from Windows and Windows RT, to iOS, OS X and Android.

The iOS version for iPhone and iPad can be found here – Apple App Store.

Windows Updates Cleanup Utility Add-on for Windows 7 SP1

Microsoft has just released a new add-on (but, they call it a Hotfix for some reason) for Windows 7 computers running SP1. The new Windows Update Cleanup installs and plugs in to the standard Windows 7 Disk Cleanup wizard maintenance utility. Once installed, Windows Update Cleanup becomes just another option you can choose in the wizard.

  • The Windows Update Cleanup option is available only when the Disk Cleanup wizard detects Windows updates that you do not need on the computer.
  • To enable you to roll back to previous updates, updates are stored in the WinSxS store even after they are superseded by later updates. Therefore, after you run the Disk Cleanup wizard, you may be unable to roll back to a superseded update. If you want to roll back to a superseded update that the Disk Cleanup wizard deletes, you can manually install the update.

You must have administrator permissions to clean up Windows update files.

  1. Start the Disk Cleanup wizard. To do this, use one of the following methods:
    • Method 1: Click Start, type cleanmgr in the Start Search box, and then click OK.
    • Method 2: Click Start, click All Programs, click Accessories, click System Tools, and then click Disk Cleanup.
    • Method 3: If a Low Disk Space notification appears, click the notification to open the Disk Cleanup wizard.
  2. Select the Windows 7 system drive, and then click OK.

    Note This operation might take several seconds because the Disk Cleanup wizard searches for files on the drive that can be cleaned up.

  3. If the Windows Update Cleanup option is not displayed on the Disk Cleanup tab, click Clean up system files. If the Windows Update Cleanup option is displayed on the Disk Cleanup tab, go to step 5.

    Note The Windows Update Cleanup option is available only when you log on by using administrator permissions.

  4. Select the Windows 7 system drive, and then click OK.
  5. On the Disk Cleanup tab, select Windows Update Cleanup, and then click OK.

    Note By default, the Windows Update Cleanup option is already selected.

  6. When a dialog box appears, click Delete Files.

To download the utility (Hotfix) from here: Windows Update Cleanup

End of support for Windows XP

RIP XP

Microsoft will end all support for Windows XP on 8 April 2014—please upgrade all Windows XP workstations to Windows 8 or Windows 7 prior to this date.

While Office 365/Other services will not block connections from fully patched Windows XP computers after 8 April 2014, connectivity to the service will be at risk. Windows XP workstations that have not deployed all service packs and automatic updates run an even higher risk of Office 365 connectivity issues after support for Windows XP ends.

Internet Explorer 11 – Preview

Snip20130921_1

Internet Explorer 11 Release Preview is a prerelease version of Internet Explorer 11. It includes enhancements to browsing performance, and better protections for your PC and your privacy. Here’s your chance to be one of the first to try out the preview. We’ll use your feedback to make the final product even better.

Click here to get it

Moving Bookmarks – Internet Explorer Favorites to Safari Bookmarks

  1. One quick way to move your Favorites, or browser bookmarks, to a new computer is to start Internet Explorer.
  2. Go to the File menu and select “Import and Export.”
  3. When the Import/Export wizard starts up, choose “Export Favorites” from the list of actions and click on the Next button.
  4. Once you select your Favorites file, you can export it to the desktop or a folder on your PC.
  5. From there, you can copy the exported Favorites file onto an external drive.
  6. Copy it to your new Mac.
  7. Once you get the file on your Mac, you can add the Favorites to the Mac OS X Safari Web browser.
  8. Start the Safari program.
  9. Go to the File menu and choose Import Bookmarks.
  10. Navigate to the folder where you have stored your exported Favorites file.
  11. Click on the Import button to pull in the bookmarks.


Active directory users joining from Mac machine

Active Directory

Joining a Mac to the Domain on Mac OS X

Snip20130701_4

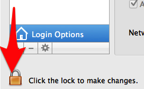
Click Users & Group from System preference and click Unlock button

Snip20130701_5

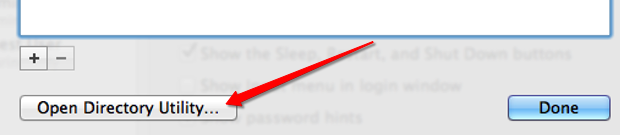
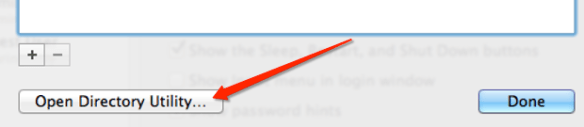
Select the Network Account Server by clicking “Edit” button…this will open the below screen option., then click “Open Directory Utility…

Snip20130701_9

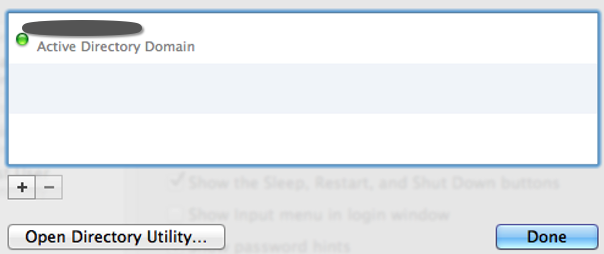
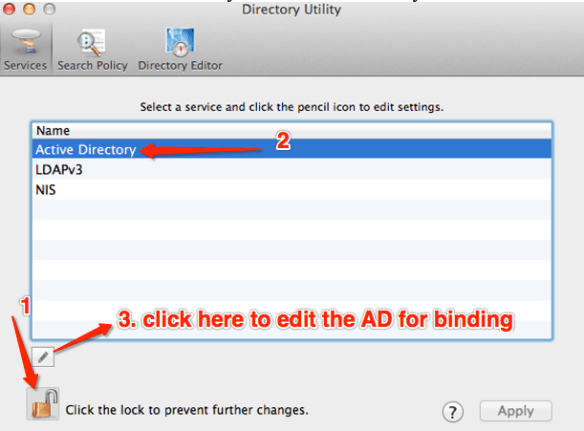
Unlock the edit button and click the Active Directory to select and bind

Snip20130701_8

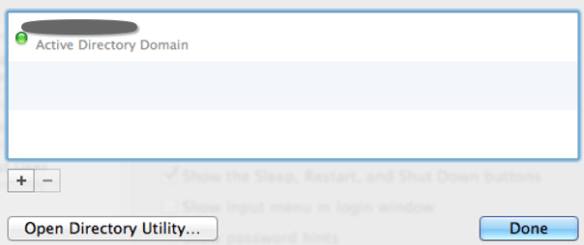
When you click the edit button, next screen will open to type

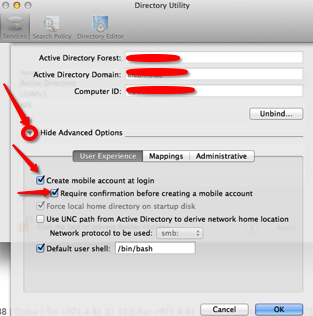
  • Active Directory Forest:
  • Active Directory Domain:
  • Computer ID

after typing all the above values, click “Bind

Here another screen will appear to enter Domain Administrator and Password for bind process. type the information and click ok

If the details are correct, below screen will appear with the GREEN button, showing that you have successfully bind the AD to your machine.

Snip20130701_7

After the Bind process to the domain, Expand the “Show Advanced Option” and select the “User Experience” and check the following.

Snip20130701_10

Above selection of “Create mobile account at login”, is only for, if the AD user wants to login at offline mode. This can only be done, if the AD user has logged in once at the on-permises time, so that the system can cached it.

Click ok and go back to Users & Group

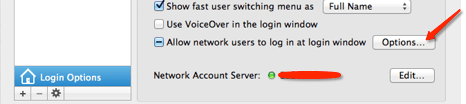
Click the “Option” button from “Allow network users to log in at login window”

Snip20130701_11

Another screen will pop-up..by default “All network Users” is selected (if you want to keep all the AD users to log into this computer, keep it as it is or select “Only these network users” and then click the “+” button at the bottom. This will open another window with all the AD users list. Select the user that you want to add and click “Done”

Snip20130701_12

Now go back to the Users & Group, click the Login Option and select the “Display login window as”

Snip20130701_13

If you select “List of users” then this will show only all the active users in that machine at the login time.

If you select the “Name and Password” option, then you can type the user name and the password.

To give the AD user, LOCAL ADMIN right, at the Users & Group Login option, Select the user and then check mark the “Allow user to administer this computer”

Snip20130701_14

Now you are good to go…now unlock the “Login Option” to save the settings and prevent from unauthorised mistakes

Restart the Mac machine and login

Enjoy!!!

Windows Azure – Site-to-Site & Point-to-Site VPN’s

Snip20130701_1

New features added to the Azure Portal

Snip20130701_2

Appreciate this great move from Azure team, especially Yu-Shun Wang, Program Manager for Windows Azure Networking

Watch the Channel9 discussion about the same..click here

Click here to read more from ScottGu’s Blog

Windows Azure: General Availability of Infrastructure as a Service (IaaS) 

Tutorial on how to “Configure a Point-to-Site VPN in the Management Portal” 

Windows Azure Developer Center

If you don’t already have a Windows Azure account, you can sign-up for a free trial.

Enjoy!!!

Rollup 1 for Exchange Server 2010 SP3 – Released

Again our Exchange CXP team released Update Rollup 1 for Exchange Server 2010 SP3 to the Download Center.

A known issue with Exchange 2010 SP3 RU1 Setup

You cannot install or uninstall Update Rollup 1 for Exchange Server 2010 SP3 on the double-byte character set (DBCS) version of Windows Server 2012 if the language preference for non-Unicode programs is set to the default language. To work around this issue, you must first change this setting. To do this, follow these steps:

  1. In Control Panel, open the Clock, Region and Language item, and then click Region.
  2. Click the Administrative tab.
  3. In the Language for non-Unicode programs area, click Change system locale.
  4. On the Current system locale list, click English (United States), and then click OK.

After you successfully install or uninstall Update Rollup 1, revert this language setting, as appropriate.

Exchange team is planning to resolve it in a future rollup, but did not want to further delay the release of RU1.


Exchange 2013 – top features

Exchange server 2013, Increase user productivity and keep your organization safe, while maintaining the control you need.

i want to remain in control…

Exchange lets you tailor your solution based on your unique needs and ensures that your communications are always available, while you remain in control, on your own terms—online, on-premises, or a hybrid of the two.

To know more, Click here

Microsoft GP – eXtender Opt In with e-One

In my previous blog i mentioned about discontinuing direct support of Extender from GP module. We have to contact directly with e-one. Some of the e-One dedicated partners have been left a little confused by recent message from Microsoft describing the Extender Opt in process. e-One blog clarifies clarify a few things for everyone here in this blog regarding the transition process.

Enjoy!!!