
So here we go, after we have gone through a months of nightmares, here are some of the guideline for how to deploy GP 2015 web client on Microsoft Azure platform. The test starts with GP 2013…and ended up 2015. Now its working satisfactory…
History of an ERP system
The Dynamics GP product was originally developed by Great Plains Software, an independent company located in Fargo, North Dakota, which was run by Doug Burgum. Dynamics Release 1.0 was released in February 1993. In late 2000, Microsoft announced the purchase of Great Plains Software for $1.1 billion. This acquisition was completed in April 2001.

August 2014: Now that we plan to start migrating from GP 2013 Web Client, we got an idea for moving our ON-PREM server to a proper DR site….to dream this solution; its beautiful…to implement, its a pain…
Microsoft Azure came into picture…its not just that, we have no guideline for how to slice and dice this environment to host Microsoft GP from Azure….along with Microsoft CRM Online integration. i did ask our GP community to help me..but no reply
Its a major task….and our nightmare starts….Team Spirit at its best Myself, Vaidy and Shiyas discussed our plan and submit to our Executive Director Jimmy @ Elcome International, who is there for all the help…approved our plan to go ahead.

Planning checklist started….
- All the Crystal reports to be converted to SSRS reports
- Get ready to go with existing GP code to be compatible with GP desktop/web client
- CRM should be Microsoft Online CRM
- ERP has to be there at Microsoft Azure
- Azure VM needs to setup…..
- Integration between our online CRM & Microsoft GP using Scribe
- Instead of Terminal session, use Remote Apps.
- DNS propagation and IIS/Certificate installation
- User training and new environment adaptation…
- Discuss any other technical glitch for moving our critical business application cloud go-live on halt…
- there you go….
- Once we move our server to cloud…we are totally depend on our ISP internet connection. We have only one internet connection, 100Mpbs. Once this is down, our business halt….so we need another internet connection., that also from a different switch/route from ISP. The reason is because if the one network is down, the other network will server the purpose. What if whole internet is down? We have planned for a 4G modem route; also from 2 ISP data SIM….If this is also down, We have a backup link from Satellite to serve the purpose…but this is the last option.
So lets start moving our PAWN….boarder has been drawn…deadline has been set….
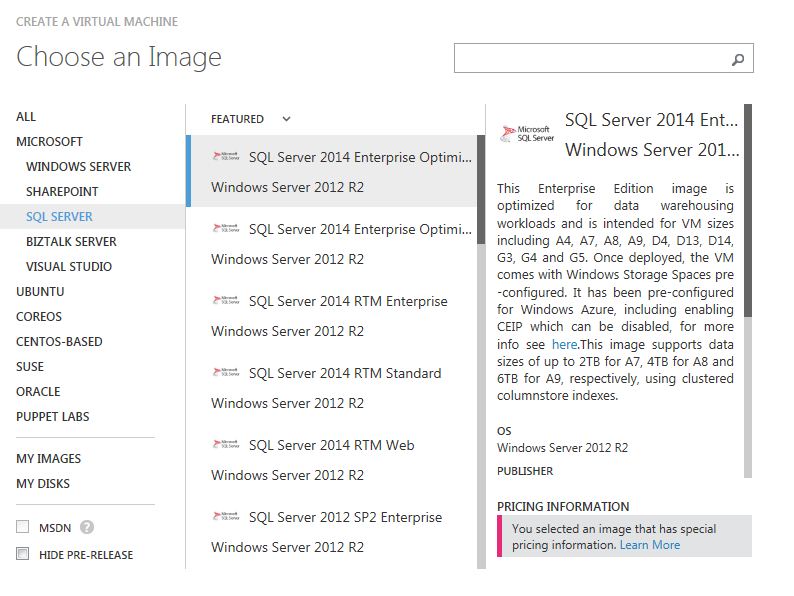
First thing first….Azure slice…We have done quite a lot of mistakes, while provisioning the SQL server…below was the primary configuration we deployed. (This was done, when Remote App @ Azure is still under preview)
- What machines did you select, who did the sizing for you.
- SQL Server Azure Machine Type: A7, 8core, 56GB RAM
- Server Configuration Window Server 2012 R2 64bit with SQL 2104
- Terminal Server (For users to access GP Client): Azure Machine Type: A7, 8core, 56GB RAM
- Fresh Installation on Azure: ZONE: East Asia
- How did we deploy your instances.
- Details as mentioned above
- Sizing: There are no documet support received from Microsoft/Partner, at this stage, so we did it ourself
- We have raised the questions to different product blog platform from Microsoft and no response so far
- What are the total concurrent number of users for each?
- Terminal Server users: 40
- Great Plains users: 60
Build number at the time of this test (September 2014): GP 2013 R2 – 12.00.1745
Testing started….
Connecting to the server took a very long time from Web Client. Rendering issues of each window…Lookup issues
Done an installation of windows client as in Dynamics GP client on-premise, then we did a testing with Dynamics GP client installed on 4 machines on-premise. These clients connected to Azure ERP (database) server. Below were the observations:
- Performance in terms of transactions lookup and entry was slower than Azure Terminal Server setup.
- Posting transactions took more time than desired.
- Windows rendering was not bad like it was in Azure TS setup, but field to field traverse within a window took a bit longer than on-premise TS and Azure TS setup.
October 2014: Testing still in progress and we have moved multiple scenario as to
- Web client only – 40 users from different region
- Web Client and GP desktop client – 20 users from the office only
Still no sign of user experience improvement…we have decided to call Microsoft Centre of Expertise for help….
Performance issues may occur because of the Datacenters latency. This link will help you identify the latency and what is the closest datacenter to your location.
November 2014:
they are in…..done couple of testings on the existing scenario…
OUR LEARNING CURVE….with them
- Reference to few articles from Microsoft that we referred Article1 & Article2
- SQL Server HA http://msdn.microsoft.com/en-us/library/azure/jj870962.aspx
- GP SQL tuning https://community.dynamics.com/gp/f/32/t/124545.aspx
- Guidelines for Deploying and sizing the web client http://azure.microsoft.com/en-us/documentation/articles/cloud-services-connect-virtual-machine/
- GP Web Client Req.https://mbs.microsoft.com/customersource/northamerica/GP/learning/documentation/system-requirements/MDGP2013_system_requirements_web_apps#Overview
- https://mbs.microsoft.com/customersource/northamerica/GP/learning/documentation/system-requirements/MDGP2013_system_requirements_webclient
Best practice to consider while doing SQL server provisioning on Microsoft Azure… (I’m considering here only my region..each admin should consider their region when it comes to azure regional datacenter selection)
So here are the facts, which needs to be taken care while provisioning the SQL server on Azure for ERP data platform. Click here to read.
Monday, November 24, 2014
As per our tests today we can conclude the following:
- Performance is good with 1 and 6 users test.
- Posting, rendering and loading are Ok
- No bottlenecks noticed on the RS and SQL machine in terms of Memory and Processor
- We noticed higher activity related to the Network and Disk I/O’s which also was in the normal range
- Also Nearest DC is East Asia and latency is within accepted range
- System is configured properly.
- We also found that A7 may not be needed as there are a lot of unused resources.
Based on that we discussed and agreed on the following action plan
- We will do another test with 30 users and will monitor the RS and SQL Server.
- Depending on the resource consumption we will create an A4 machine as another RDS in the same cloud service and will do another 30 users test
- Based on the performance results and resource consumption we will decide to use which machine.
Thursday, December 4, 2014: As per our Second round test we conclude the following
- Performance related to the RDS and Latency is Ok
- We faced 1 user latency issue and we have tested the same user from another machine and it was Ok, so I assume that this is a machine specific issue.
- Transaction posting, Fields lookup and populating is Ok
- We found out that 1 Transaction with average 50 lines was posted in around 8 minutes which is not acceptable related to previous experience and we agreed that you will perform some database maintenance checks (DBCC, Index and Update statistics) on Sunday and retest the high volume postings noting that we didn’t find any unusual bottle necks in SQL during the posting process.
Following are the observations after running DBCC checks and updates:
- DBCC CHECKDB returned no errors on both DYNAMICS (app database) and ELDB (GP company database)
- With GP2013, DBCC REINDEX script (to run for multiple tables) is not provided as it is configured directly on SQL.
- “Auto Create Statistics” and “Auto Update Statistics” are also setup on both databases by default.
I then posted a GRN with 347 line items and it took exactly 7 minutes (8 minutes less than our previous testing AND 3 minutes more than on-premise). Please note that no other user(s) had logged on when I posted this transaction.
We now should consider in line with Expertise that we can be aligned, that simulate a production scenario go with 3 servers A7 SQL, A4 RDS and A4-A5 for your web components. Please note that A5 is 2 cores and 14 GB of RAM based on the test result we may need to increase the cores but for now we can start by this configurations and see.
- A4 machine Scenario is good and CPU average usage is way far from the A5 machine
- We noticed that the antimalware extension installing is hanging do we removed it from the SQL Server machine and will restart it
- For the RDS machine it will remain as it is till we finalize the Web client stress test
- We noticed a list form that freeze, this can be due to IE temporary files and cache.
- We cleared the cache, also we lowered the settings for the trusted zone to medium-low and installed the trusted cert from Web client and we retested the issue, it was gone.
- From a common-best practice users can do a more filtered lookups if possible and try to minimize the scroll to end in one click to maintain the buffer for running any form related script smoothly.
Next Actions
- We need to stress test the web server.
- Conclude the outcome.
- After Removing the Extension installation and restarting the SQL Server, it returned to normal
- The Web Server had no bottle necks
- Some of the users faced some screen freezing when they scrolled from top to bottom and vice versa quickly. (User behaviour issue)
The following are some notes regarding Internet explorer and user behaviour
- Only Windows 8 and IE 10 are supported with GP2013, Windows 8.1 and IE 11 are supported with GP 2015
- It is recommended to Adjust IE settings by Emptying the IE temporary files, Lower the security settings to medium low in the trusted sites and adding the Web Server URL to the trusted sites, installing the security add on prompted by the GP web Client(May require local admin privilege), update your Silverlight.
- The most important thing is to educate the user of the face that this should happen if the user doesn’t follow the common practice.
Microsoft Dynamics GP 2015, Web Client both became available to Dynamics Partners/Customers from December 2014…With this deployment, this is clearing a lot of issue what we face on GP 2013 web client….So another task…replace with GP 2015
Today…Sunday, December 28, 2014

So now we have come to a conclusion for how to go ahead further…..
- Backup line is up….trying to find a device to manage multiple VPN…Cradle Point?…till then TMG
- Few users computer needs to upgrade
- Going for a Hybrid approach…meaning GP 2015 Web Client and GP Remote Apps (reason for this remote apps is because Analytical accounting is not supported by Web Client)
Now we start getting another issue….
While trying to access our SSRS reports from within GP 2015 web client, using Internet Explorer 10, we are receiving a critical error titled “AsyncCallBackException”. Reports are invoked programmatically using “URL Access” method and authentication is happening within same domain.
DETAILS:
We have written a plugin to invoke our SSRS reports from within GP 2015 web client. Function that we use is as follows:
- Dynamics.Forms.SyVisualStudioHelper.Functions.DexUtilityLaunchUrl.Invoke(sReportName);
- URL is constructed by using URL Access method by directly calling SSRS Report Server report path.
- Report is getting generated without any issues. But once we close the browser that rendered the report, following series of errors are received:
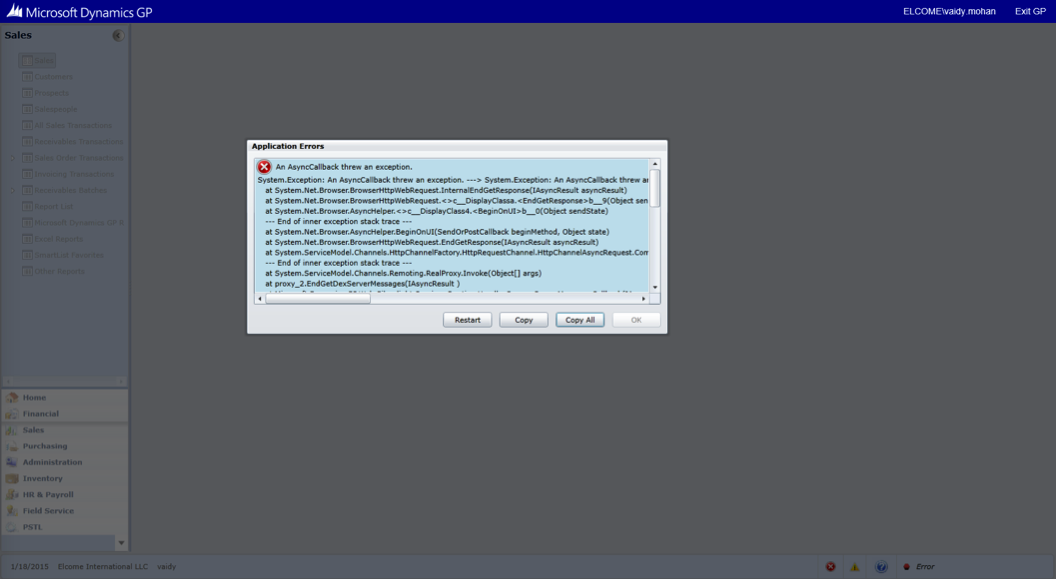

If we close our browser and reconnect to the session, we retain some of the errors OR some functionalities such as Lookup button, tabbing out, etc. do not work.
Kindly note that any other website could be launched with the same without any issues. There is a GP forum post which is exactly the same issue, but no resolution is posted out there:
The funny part is that GP 2015 web client works well with Google Chrome browser….we did not expect that coming…but IE issue remains same

Severity: Critical
Summary: An AsyncCallback threw an exception.
Details:
System.Exception: An AsyncCallback threw an exception. —> System.Exception: An AsyncCallback threw an exception. —> System.ServiceModel.CommunicationException: The remote server returned an error: NotFound. —> System.Net.WebException: The remote server returned an error: NotFound. —> System.Net.WebException: The remote server returned an error: NotFound.
at System.Net.Browser.BrowserHttpWebRequest.InternalEndGetResponse(IAsyncResult asyncResult)
at System.Net.Browser.BrowserHttpWebRequest.<>c__DisplayClassa.<EndGetResponse>b__9(Object sendState)
at System.Net.Browser.AsyncHelper.<>c__DisplayClass4.<BeginOnUI>b__0(Object sendState)
— End of inner exception stack trace —
at System.Net.Browser.AsyncHelper.BeginOnUI(SendOrPostCallback beginMethod, Object state)
at System.Net.Browser.BrowserHttpWebRequest.EndGetResponse(IAsyncResult asyncResult)
at System.ServiceModel.Channels.HttpChannelFactory.HttpRequestChannel.HttpChannelAsyncRequest.CompleteGetResponse(IAsyncResult result)
— End of inner exception stack trace —
at System.ServiceModel.Channels.Remoting.RealProxy.Invoke(Object[] args)
at proxy_2.EndGetDexServerMessages(IAsyncResult )
at Microsoft.Dynamics.GP.Web.Silverlight.Services.RuntimeHandler.ProcessServerMessagesCallback(IAsyncResult result)
at System.ServiceModel.AsyncResult.Complete(Boolean completedSynchronously)
— End of inner exception stack trace —
at System.ServiceModel.AsyncResult.Complete(Boolean completedSynchronously)
at System.ServiceModel.Channels.ServiceChannel.SendAsyncResult.FinishSend(IAsyncResult result, Boolean completedSynchronously)
at System.ServiceModel.Channels.ServiceChannel.SendAsyncResult.SendCallback(IAsyncResult result)
at System.ServiceModel.AsyncResult.Complete(Boolean completedSynchronously)
— End of inner exception stack trace —
at System.ServiceModel.AsyncResult.Complete(Boolean completedSynchronously)
at System.ServiceModel.Channels.HttpChannelFactory.HttpRequestChannel.HttpChannelAsyncRequest.OnGetResponse(IAsyncResult result)
at System.Net.Browser.BrowserHttpWebRequest.<>c__DisplayClass19.<InvokeGetResponseCallback>b__17(Object state2)
at System.Threading.QueueUserWorkItemCallback.WaitCallback_Context(Object state)
at System.Threading.ExecutionContext.Run(ExecutionContext executionContext, ContextCallback callback, Object state, Boolean preserveSyncCtx)
at System.Threading.QueueUserWorkItemCallback.System.Threading.IThreadPoolWorkItem.ExecuteWorkItem()
at System.Threading.ThreadPoolWorkQueue.Dispatch()
at System.Threading._ThreadPoolWaitCallback.PerformWaitCallback()
Severity: Critical
Summary: The remote server returned an error: NotFound.
Details:
System.ServiceModel.CommunicationException: The remote server returned an error: NotFound. —> System.Net.WebException: The remote server returned an error: NotFound. —> System.Net.WebException: The remote server returned an error: NotFound.
at System.Net.Browser.BrowserHttpWebRequest.InternalEndGetResponse(IAsyncResult asyncResult)
at System.Net.Browser.BrowserHttpWebRequest.<>c__DisplayClassa.<EndGetResponse>b__9(Object sendState)
at System.Net.Browser.AsyncHelper.<>c__DisplayClass4.<BeginOnUI>b__0(Object sendState)
— End of inner exception stack trace —
at System.Net.Browser.AsyncHelper.BeginOnUI(SendOrPostCallback beginMethod, Object state)
at System.Net.Browser.BrowserHttpWebRequest.EndGetResponse(IAsyncResult asyncResult)
at System.ServiceModel.Channels.HttpChannelFactory.HttpRequestChannel.HttpChannelAsyncRequest.CompleteGetResponse(IAsyncResult result)
— End of inner exception stack trace —
at System.ServiceModel.Channels.Remoting.RealProxy.Invoke(Object[] args)
at proxy_2.EndProcessDexClientMessages(IAsyncResult )
at Microsoft.Dynamics.GP.Web.Silverlight.Services.RuntimeHandler.<>c__DisplayClass2.<ProcessClientMessages>b__1(IRuntimeService channel)
at Microsoft.Dynamics.GP.Web.Silverlight.Services.RuntimeHandler.InvokeCallWithMessageHeaders(Action`1 a)
at Microsoft.Dynamics.GP.Web.Silverlight.Services.RuntimeHandler.ProcessClientMessages(Byte[] data)
at Microsoft.Dynamics.GP.Web.Silverlight.MessageManagementService.FlushQueueWorker_DoWork(Object sender, DoWorkEventArgs e)
Severity: Critical
Summary: Object reference not set to an instance of an object.
Details:
System.NullReferenceException: Object reference not set to an instance of an object.
at Microsoft.Dynamics.GP.Web.Silverlight.Momm.CommandMessageActions.CommandAddChild(IWCDexMessage message)
at Microsoft.Dynamics.GP.Web.Silverlight.MessageManagementService.ProcessMessage(IWCDexMessage message)
at Microsoft.Dynamics.GP.Web.Silverlight.MessageManagementService.ProcessMessages(IEnumerable`1 messages)
at Microsoft.Dynamics.GP.Web.Silverlight.MessageManagementService.<>c__DisplayClass1f.<ProcessReturnBytes>b__1d()
at Microsoft.Dynamics.GP.Web.Silverlight.Extensions.ApplicationHelper.<>c__DisplayClass7.<ExecuteOnUIThreadSync>b__3()
This issue is still doing the test with Microsoft…till then i will stick to Google Chrome browser.
So far so good… learned a lot with this deployment….
No my GP 2015 is now serving from Azure cloud to all our users…Finance/Accounts users, they are using GP 2015 desktop client.

This document will keep on updating with more and more solutions, as and when we cleared.


