Educational Purpose – Free Office 365 – UAE – Microsoft Gulf

Snip20150224_1

Microsoft has announced the free availability of Office 365 and Office 365 ProPlus to students, faculty and staff all across the world – at no charge, starting today, February 23, 2015. Microsoft Office 365 ProPlus for Education is a communication and collaboration platform available in the cloud, currently used by over 110 million students, faculty and staff worldwide.

Eligible students, Microsoft notes, will be able to sign up for Office 365 ProPlus and install Word, Excel, PowerPoint, OneNote and Access on up to 5 PCs or Macs and mobile devices including Android, iPad and Windows tablets. In addition, they’ll also have access to OneDrive and Office Online.

From now on, students can check their eligibility for free Office from their school. Teachers can do the same by clicking here.

Good move from Microsoft Gulf 🙂

Read Emirates 24/7 article

Microsoft Exchange Connectivity Analyzer Tool – Client

The Microsoft Connectivity Analyzer Tool is a downloadable client program that is used to identify connectivity issues that occur between email clients and a server that is running Microsoft Exchange Server. The tool can also be used to identify connectivity issues between email clients and Office 365. The tool can be used both by email users, to identify common problems, and by IT Administrators, to troubleshoot issues that are affecting their Exchange Server deployments.

The Microsoft Connectivity Analyzer Tool simulates several client logon and mail flow scenarios. When a test fails, many of the errors message provide troubleshooting tips to help the user or IT Administrator to resolve the problem.

This tool is a companion tool to the Remote Connectivity Analyzer website. Whereas the Remote Connectivity Analyzer website enables IT Administrators to pinpoint connectivity issues by simulating connectivity from a location outside the customer environment, the Microsoft Connectivity Analyzer Tool lets both email users and IT administrators run the same tests within the user’s environment.

You must be running one of the following operating systems:

  • Windows 8
  • Windows 7
  • Windows Server 2008
  • 64-bit edition of Windows Vista

Download the client tool (Microsoft Connectivity Analyzer (Beta) here.

Connectivity check as follows

a0

a01

a02

Select one of the option below to continue to next screen

a03

Enter the credential you want to check for connectivity issues

a04

a05

Enjoy!!

What’s new with Microsoft Remote Connectivity Analyzer? A lot!

They have done it again.. now with a lot of option

Microsoft Connectivity Analyzer (beta), a portable version of the Remote Connectivity Analyzer website, and a short 49 second video that introduces the Microsoft Connectivity Analyzer.

Read more…click here

Microsoft Connectivity Analyzer Pre-Requisites

  1. The tool supports the following operating systems: 64bit Windows 7, Windows 7, Windows Server 2008+
  2. Microsoft .NET Framework 4.5 is required.
  3. Browsers requirements:

The installation will work on all modern browsers. However…

Good work folks!!!

Nokia Lumia 920 – The Phone that sets the standard

  • 8.7 megapixels Camera sensor (main camera resolution)
  • Nokia PureView Camera
  • 4.5 ” Display size
  • Snapdragon™ S4 Processor name
  • 10 h Talk time (3G)
  • 400 h Standby time (3G)
  • 67 h Maximum music playback time

Operating system and software

The Nokia Lumia 920 runs the Windows Phone 8 operating system. As with other Lumia devices, the 920 includes Nokia-exclusive apps, like Nokia City Lens, an augmented reality software that gives dynamic information about users’ surroundings. Click here for Specifications.

Inductive charging

The phone can be recharged either physically or inductively using the Qi technology. Rather than requiring the use of a physical connection to the phone, this requires the phone to be placed upon a charging pad which, unlike a physical connector, hinders use of the phone while charging. The charging pad requires a separate power supply.

Processors, memory, and storage

The Lumia 920 has a 1.5 GHz dual-core Qualcomm Krait, and a Qualcomm Adreno 225 GPU, and has 1 GB of system RAM

Nokia Lumia 920 comes with an internal storage capacity of 32 GB. Although Windows Phone 8 supports storage expansion using microSD cards, Lumia 920 does not support them.

Screen

The Lumia 920 has a 4.5-inch curved glass display running at WXGA (1280 × 768) resolution with an aspect ratio of 15:9 using enhanced IPS screen technology which Nokia calls “PureMotion HD+”. It has less than 9 ms average transition times, where conventional IPS LCDs have an average of 23 ms, which reduces motion blur.

Camera

The Lumia 920 has Nokia’s PureView technology on the rear camera, which Nokia claims to be the best currently available on any smartphone, capturing “five to 10 times more light than competitor devices” via a “floating lens technology that surpasses the optical image stabilization system of most digital SLRs.

Click here for accessories list.


Sky Drive – All you need to know!!!

If you have a Windows Live account (or an old Hotmail account), then you have 25GB of free storage on SkyDrive. If you don’t have one, go and grap it. SkyDrive is a great way to store lots of files in the cloud for easy access remotely. Windows 7  and now defenetely on windows 8 will let you map your SkyDrive folders as network drives, making access even simpler.

How to map SkyDrive to your computer?

Windows 7 will let you map your SkyDrive to your local machine. How to do it? Here is the step

  • Sign in to your Windows Live account.
  • Get your ID from the address bar (Below showing how to get it)
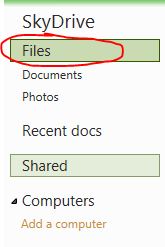
    • Click on the “Files” as shown below

    • Look at the address bar and you will find your “CID” number just copy that number
  • Now go to your Windows 7 computer
  • Open My Computer, then select “Map network drive” near the top bar.
  • Select the drive letter you want, then type the following  under the “Folder bar”
  • \\docs.live.net@SSL\ and then copy your CID number here \
  • Check mark “Reconnect at logon”
  • Click Finish
  • Once you click finish, system will automatically attempt to log on to your SkyDrive.
  • Next system will show you to enter SkyDrive credential.
  • Enter the username and password and clik PK

Thats it..your SkyDrive is now mapped to your local machine.

Here you can rename the folder (If in case the language is not proper in you SkyDrive). What ever you do at the local “mapped” Skydrive, it will reflect in your SkyDrive as well.

Apps for SkyDrive?

Allmost all the device now support SkyDrive and it is free apps..you just name it..Windows, Mac, Windows Phone, iPhone, iPad…Click here to download it

Read the article from Mike Torres, and Omar Shahine, group program managers for SkyDrive.

Enjoy!!!


Import contacts into Outlook from Excel

Exporting from Excel

  1. If row 1 of your spreadsheet contains column descriptions, such as “Name,” “E-mail Address,” and so on, skip to step 3. If it does not, add one that does by right-clicking the 1 to the left of the first row, and then clicking Insert.
  2. In the new blank cells at the top of each column, type a description for that column, such as “Name,” “E-mail Address,” “Company,” “Phone Number,” and so on.
  3. On the File menu, click Save As.
  4. Choose a folder to save to from the Save in drop-down list, type a name for the file, such as “Contacts,” in the File name box, and in the Save as type drop-down list, click CSV (Comma delimited).
  5. Make a note of the folder location, and then click SAVE.

Importing into Outlook (older versions)

  1. If you are importing into an existing Contacts folder, skip to step 3. To create a new folder in Outlook, click Folder List on the View menu, unless the Folder List is open already.
  2. Right-click the Contacts folder, and then click New Folder, type a name for the new folder, and then click OK.
  3. On the File menu, click Import and Export, click Next, click Comma Separated Values (Windows), and then click Next.
  4. If the file that is displayed is not the correct file, click Browse, browse to the folder noted in step 3, and then double-click the file to select it.
  5. If you are importing into a new folder, the Options settings is irrelevant because there are no duplicates. If not, choose the most logical selection. Click Allow duplicates if you are not sure, and then click Next.
  6. Click the Contacts folder, or other contacts-type folder that you have created, to import into, and then click Next.
  7. If you are not sure that the column names in the first row of the spreadsheet will map correctly to the Outlook fields, click Map custom fields to verify them.

    NOTE: If Map custom fields is unavailable, you have chosen a non-contact-type folder to import into. Click Back, and then choose the correct folder. If you are satisfied with the mapping, click OK to close the Map Custom Fields dialog box, and then click Finish.

Importing into Outlook 2010

  1. If you are importing into an existing Contacts folder, skip to step 4.
  2. Create a new folder in Outlook 2010
  3. Right-click the Contacts folder, click New Folder, type a name for the new folder, and then click OK.
  4. Click the File tab in the Ribbon, and then click Open on the menu.
  5. Click on Import tab. The Import and Export Wizard opens.
  6. If the file that is displayed is not the correct file, click Browse , browse to the folder that is mentioned in step 3, and then double-click the file to select it.
  7. If you are importing into a new folder, the Options settings are irrelevant because there are no duplicates. If you are not importing to a new folder, choose the most logical selection. Click Allow duplicates if you are not sure, and then click Next .
  8. Click the Contacts folder or another contacts-type folder that you have created, and then click Next.
  9. If you are not sure that the column names in the first row of the spreadsheet will map correctly to the Outlook fields, click Map custom fields to verify them.

Attachments not showing in Microsoft Outlook

Interesting topic

ISSUE: When an user sends email with  attachment Microsoft Outlook clients don’t see paperclip nor attachment but the size of the mail shows there is more then just text. The attachment is visible in OWA. When forwarding the message from OWA the attachment shows up in outlook.

FINDINGS: I think the issue related to misformed MIME. The content type of the email is not correct; it is multipart/related, and should be multipart/mixed.

  • It may or may not be an issue on your end, incorrectly formatted mime messages sent by the sender can cause it not to render correctly in Outlook.
  • Things like the sender running third party apps such as disclaimers can mess up the mime formatting.
  • RFC 2387 describes the intended use of multipart/related:
    • “The Multipart/Related media type is intended for compound objects consisting of several inter-related body parts. For a Multipart/Related object, proper display cannot be achieved by individually displaying the constituent body parts.”
    • Exchange handles multipart/related specially – i.e. it considers all attachment parts inside multipart/related as “inline”. Such attachments are normally hidden from the attachment list and supposed to be accessible from the body itself, like inline images. Some clients, like OWA, can determine whether attachments are really “inline” by analyzing a message body – if they don’t find any reference to such attachment in a body they fix it by displaying it in attachment list. Other clients like Outlook will trust how attachments are marked by Exchange and hide them.
  • A “correct” way to structure message would look like this:
    • Multipart/mixed
    • Multipart/related
    • Text/html – message body
    • Any inline attachments referenced from the body
    • Any normal attachments, like application/msword

 SUGGESTION: Add a Transport Rule to simply “force” us to use multipart/mixed (Only when the mail is coming from the specific domain) and that will make the attachment visible in Outlook.

SOLUTION: Launch Exchange Management Console

  • Expand Organization Configuration
  • Select Hub Transport
  • On the right-hand Action Pane, select New Transport Rule …
  • Give the rule a name
  • Select when the From Address contains Specific Word click the highlighted “Specific words”, Type “contoso.com”
  • click Add, click OK, and then click Next
  • Select “set header with value,” click the highlighted “header” text, type
  • Content-Type, click OK
  • Click the highlighted “value” text, type multipart/mixed, click OK, and then click
  • Next
  • On the “Exceptions” page, simply click next
  • At the final “Create Rule” page
  • Click New, and then click Finish

Office 365 – 22 new markets – 64 geographies – with more to come!

Office 365 to another 22 new markets to grow our global footprint to 64 geographies  – with more to come!

Microsoft has reduced Office 365 for enterprise plans by up to 20%.

Enjoy!!!

Office 365 System Requirements – Client side

If you ever look at all the migration that we do, we have to completed the biggest challenge; clients has been getting the system requirements ready for Office 365.

 Click here to know more from my dedicated blog for O365 users.

Enjoy!!!